Now, I knew that I didn't like the wreath "as is" and would need to embellish it a bit to make it worthy of hanging on my door. Here's what I did last night, in about an hour...
I took some of our Christmas tree clippings (you know how you have to clip off some branches to fit the tree into the tree stand), and cut off the longest branches from those.

I attached them to the back side of the wreath using short pieces (about a foot at a time) of beading wire (24 gauge) that I already had on hand.

Wrap the wire around (or through, if you can) the wreath and around the greenery stem before laying down the next piece of greenery.

Since you are using small pieces of wire, you will need to use a few pieces. When you near the end of one piece (about an inch and a half remains), tie on the next small piece using the same method as you would use to twist the tie of a bread loaf bag. Alternatively, you could just roll the wire right off of the spool and wrap it all the way around the wreath. I used small pieces in an attempt to push them through the wreath and use less wire. Next year, I'll probably just wrap it all the way around, using more wire, but struggling less.

Continue in this manner until you have filled the entire wreath with the amount of greenery you desire.You may notice that I lay my greenery in the opposite direction of the wreath's twigs. I just thought it would look neat that way.
 I will remove the clippings before storing the wreath for next year, when I will refurbish the wreath again with fresh greenery.
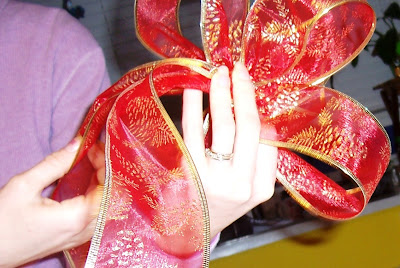
Because I am of the school that all wreaths need a bow... Next, I made a bow with some ribbon I also bought the day after Christmas last year. Start by making one loop the size that you desire for your bow.

Continue making loops and giving a little twist after each one, while holding them all in one hand!


Using the same wire I used for the greenery, I wrapped the wire around the center of the bow, moved a few loops to the side and then wrapped the wire around again.

Give each loop a little tug to see if any still need the wire wrapped around to secure them.

Because I found this wreath after Christmas, after a lot of things around it had been moved and picked over, it was missing some of its original "lushness". I chose to place the bow in the space that looked most bare.

Wrap the wire around the wreath a couple of times to secure the bow. Wrap the ribbon ends around the wreath or greenery until you achieve a look that makes you happy.

Voila!

I am slowly teaching myself the art of needle felting. My goal is to make a little cardinal to sit inside the wreath next year!
Hey...that's beautiful!
ReplyDeleteThat's very pretty. I received my choker and sachet today. Thank you so much. I love them both. I am wearing the choker right now. It's very pretty. I will sleep with the sachet tonight in my pillow. It smells nice. My mom has Young Living Essential oils too. I will sleep well.
ReplyDelete