It's been a while since I posted about my new school (okay, since I've posted about anything). It is keeping me busy in a wonderful way. I am able to use a lot of creativity at work and in preparing for work at home. How refreshing! I don't feel such a need for a creative outlet these days, because I am living it in my work life. Wow. I should share with you some of the things I am creating for work, and I will try to do that another day when I have more time (I need to finish my tea and get to sleep now). But, in the meantime...
Another waldorf thing, is rhythm. You might refer to it as "routine", and you probably know how much it helps to have one. This is especially true for children (those of you who have some or work with some know exactly what I'm talking about), and I'm finding that I am a happier camper these days now that I am knee deep in developing my own new rhythm. I'm feeling pretty fantastic, actually. It's nice.
In the kindergarten, we try to balance the day with "in" breaths and "out" breaths. An in breath is an activity that is more inward, thinking and reflection, calm, focused, requires a bit of concentration. An out breath is a more physical activity, releasing, outward. The in-out rhythm has a nice feel to it. In my classroom, it generally goes like this: circle, activity (nature walk, painting, beeswax modeling, craft, coloring, bread-making), inside play, snack, rest, outside play, story.
I am experimenting with rhythm in my personal life and remembering that I am quite a creature of habit. So, having a rhythm is very helpful to me! Not to say that the rhythm and I can't be flexible when we need to be, but that it provides me with a clear path of where I'm going and what is ahead of me each day, which sets my mind at ease. In trying to simplify, I am able to better follow my own rhythm and not get so distracted by the chaos that I see/feel around me, because the chaos (read: clutter) is slowly (but surely!) disappearing altogether or finding a home that is not in plain view of my procrastinating eyes.
So, I am trying to borrow some of my work rhythms and morph them into rhythms that will work for home life, too. In kindergarten, we have a snack schedule. Kids refer to the day of the week by what snack is being served--i.e. Monday is "rice day". Some of my colleagues have already utilized this technique at home for dinner preparation by instituting "taco Tuesday" or "Mexican Monday" or "soup Saturday"... that's not to say that is all they can eat on that day of the week, but I imagine it sure helps when Tuesday rolls around and you begin to ask yourself at 4:00 in the afternoon oh, shoot, what am I going to make for dinner?... You always have something in mind to quickly help you make the decision oh, yeah, tacos! I was thinking of instituting a similar rhythm for cleaning, but haven't been successful with a plan that I will stick to... yet.
I am curious, how do you use rhythm in your life? What rhythms have you found work really well for you?...your kids?...your family? I would love to hear from you, and then honor your success at maintaining a rhythm by borrowing your idea and trying it out for myself! ;-)
Showing posts with label teaching. Show all posts
Showing posts with label teaching. Show all posts
Tuesday, February 15, 2011

Saturday, October 2, 2010
Decoration Opinion--Crows?...Ravens?
I'm sorry I haven't been blogging as much, if anyone noticed, but I am having a bit of a difficult time adjusting to working 5 days/week instead of the 2 or 3 I had been accustomed to since Miss A was born. Additionally, kindergarten seems a lot more difficult than fifth grade, which seems like an odd thing to say.... But, the thing is, these children are learning how to be in a room with 22 other little people who also want my undivided attention, so there is a lot of adjustment for them, too. So, it's challenging in a way that I've not been challenged before. Plus, it's my first year with a kindergarten curriculum, which means I am spending a lot of my "free" time developing circles, learning songs, and things like that, rather than spending time on the computer. At first, I thought, Okay, this will just be tricky for the first year, next year I will have it down and be able to think a little more about my non-work life when I am away from school. But, then I remembered that many of our children stay with us for two years (remember, this is a waldorf-inspired school), so next year we will tell different stories, do different crafts, and lead different circles and I will be spending time learning all the new things again. At least I should have our daily/weekly rhythm down by then!... Long story short, I've been wanting to craft and sew and blog, but the time just hasn't been there. Kindergarteners take a lot more energy, too, so I can't stay up late like I used to and still have enough energy the next day. This is proving to be helpful in sticking to one of my New Year's Resolutions that had fallen by the wayside.
But, you thought I needed your opinion in this post, so why are you reading about my job? (Are you still reading?!!) Well, that was just a side-note, because it was on my mind and I wanted to thank you if you are in fact still reading this blog. Yes, I am looking for your help. Here's the deal:
We have a murder of crows (I love that!) that roost in our neighborhood. I love the fact that they are so intelligent; it freaks J out a bit. I also am a big fan of ravens. We don't have any around here, but I fondly remember the ravens from the Tower of London. So cool... Anyhow, it's getting near Halloween (in case you didn't already realize that) and I would like to step up my decorations a bit. In honor of the neighboring birds, I've decided I would like a crow/raven theme. So far, I have a bale of hay on the front porch, which has nothing to do with ravens, but it's all I've been able to do that had something of an autumn theme.
What else should I do? What should I make? (Remember the start of this post when I told you I don't have as much time on my hands as I would like...) Have you seen anything in a store, on a blog, or have you crafted something yourself that might work with my theme? Please share it here! I will do my best to follow some/all suggestions and post about it here in a timely manner.
Thank you in advance for your help, and thank you for reading this blog (though the posts are now few and far between). With gratitude!
But, you thought I needed your opinion in this post, so why are you reading about my job? (Are you still reading?!!) Well, that was just a side-note, because it was on my mind and I wanted to thank you if you are in fact still reading this blog. Yes, I am looking for your help. Here's the deal:
We have a murder of crows (I love that!) that roost in our neighborhood. I love the fact that they are so intelligent; it freaks J out a bit. I also am a big fan of ravens. We don't have any around here, but I fondly remember the ravens from the Tower of London. So cool... Anyhow, it's getting near Halloween (in case you didn't already realize that) and I would like to step up my decorations a bit. In honor of the neighboring birds, I've decided I would like a crow/raven theme. So far, I have a bale of hay on the front porch, which has nothing to do with ravens, but it's all I've been able to do that had something of an autumn theme.
What else should I do? What should I make? (Remember the start of this post when I told you I don't have as much time on my hands as I would like...) Have you seen anything in a store, on a blog, or have you crafted something yourself that might work with my theme? Please share it here! I will do my best to follow some/all suggestions and post about it here in a timely manner.
Thank you in advance for your help, and thank you for reading this blog (though the posts are now few and far between). With gratitude!
Friday, August 13, 2010
Becoming Waldorf: Our Nature Table
You may have noticed to the left over there that I am now teaching Kindergarten. Quite a jump from the fifth grade that I am used to, especially since this Kindergarten is in a Waldorf-inspired school. This is just one bonus of my new job, as Waldorf education has always resonated with me. Other bonuses include the school being a short five-minute drive away, Little Miss will be attending school there next year, the school's foundation is helping me to obtain my Masters in Waldorf Education.... the list keeps going on. THIS is the silver lining of the lay-off cloud! Something better was waiting around the corner. I am so grateful.
One of the features of the Waldorf Kindergarten is a nature table. This is a place to bring nature indoors and reflect what is happening outdoors. I like this idea so much that I have created a nature table in my home as well. Here is a picture of my first attempt a few weeks ago:

Not too bad. Uncluttered. Lavender wand (Want to learn how to make one? I bet I could tutorial that... Let me know). Beeswax candle (YUM). Seasonal flowers. A dry felted bee (Yes, that black blob is a bee. We have big, black bees swarming our passion vine all summer.). Some sycamore bark that I found on the ground. I am excited to keep this evolving as the seasons slowly change. I hope to one day get (make?) a postcard holder, as there are some beautiful postcards with seasonal images at the local Waldorf college bookstore.
So, in preparing for this job, I have been (and will continue to be) reading a lot of books written by Waldorf educators, talking to a lot of Waldorf teachers, and I have found some really neat "waldorfian" blogs. The first addition I have found to add to the nature table next summer is a strawberry, inspired by The Wonder Years. Bonus: Little Miss will be able to make some of her own to play with. Keeping our eyes open for small pinecones...
One of the features of the Waldorf Kindergarten is a nature table. This is a place to bring nature indoors and reflect what is happening outdoors. I like this idea so much that I have created a nature table in my home as well. Here is a picture of my first attempt a few weeks ago:
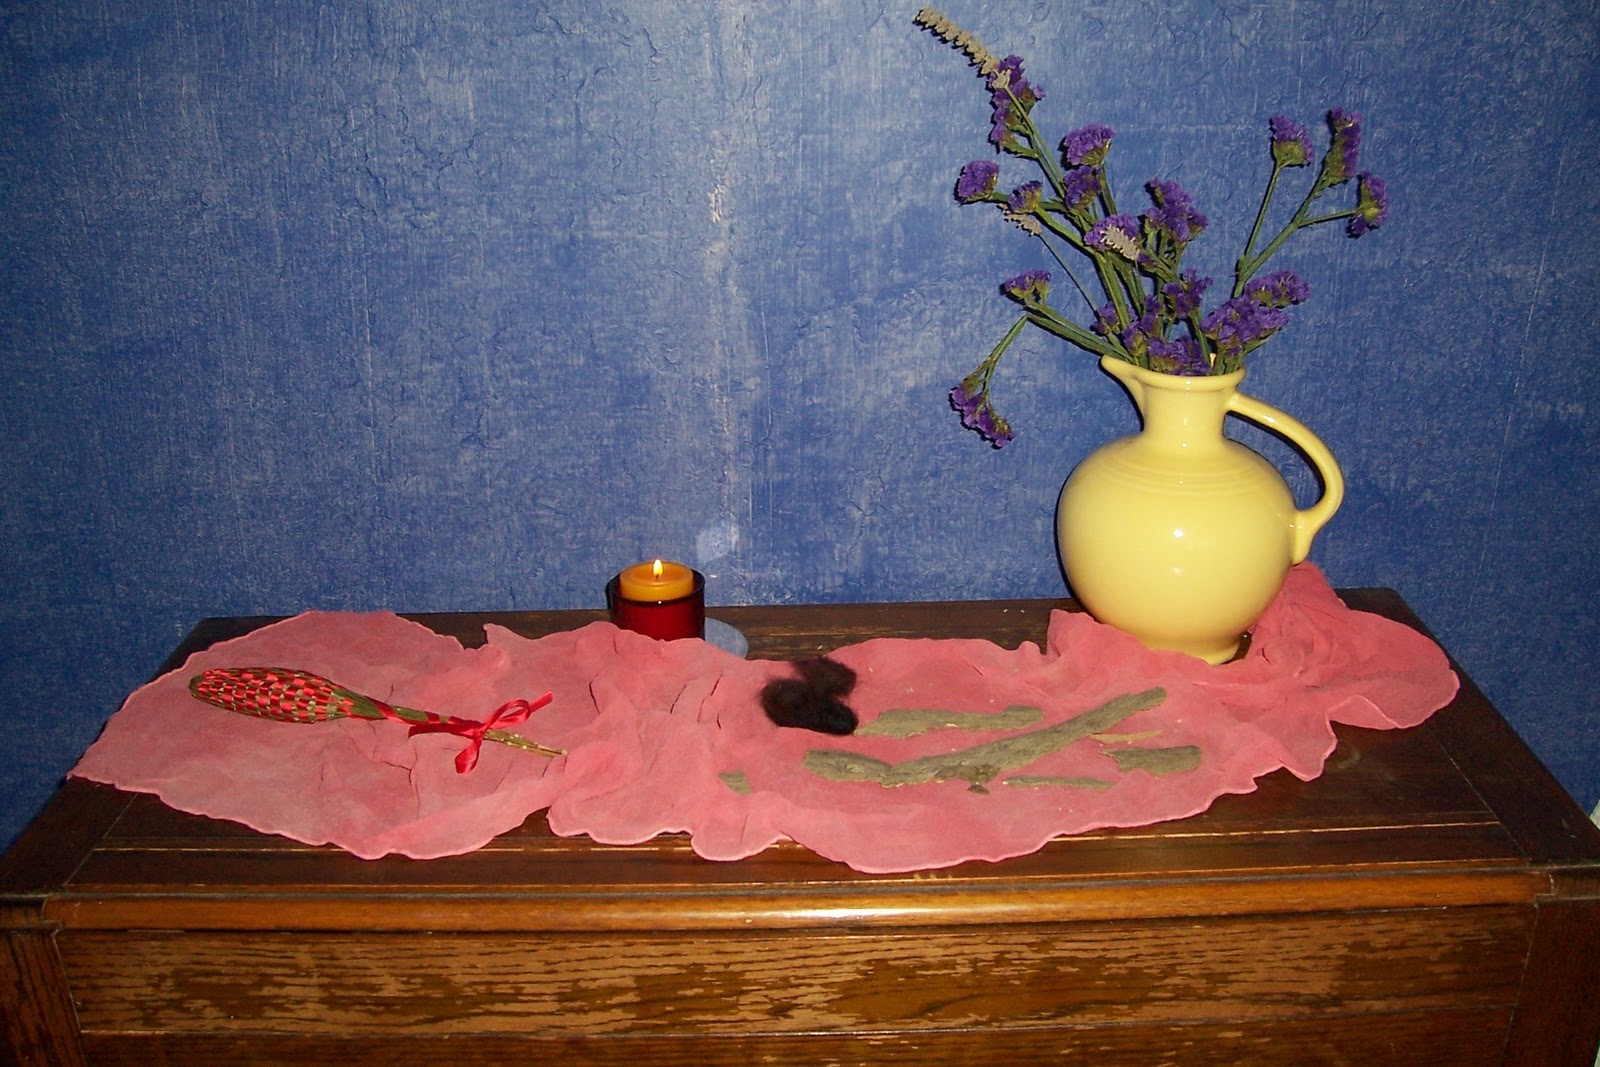
Not too bad. Uncluttered. Lavender wand (Want to learn how to make one? I bet I could tutorial that... Let me know). Beeswax candle (YUM). Seasonal flowers. A dry felted bee (Yes, that black blob is a bee. We have big, black bees swarming our passion vine all summer.). Some sycamore bark that I found on the ground. I am excited to keep this evolving as the seasons slowly change. I hope to one day get (make?) a postcard holder, as there are some beautiful postcards with seasonal images at the local Waldorf college bookstore.
So, in preparing for this job, I have been (and will continue to be) reading a lot of books written by Waldorf educators, talking to a lot of Waldorf teachers, and I have found some really neat "waldorfian" blogs. The first addition I have found to add to the nature table next summer is a strawberry, inspired by The Wonder Years. Bonus: Little Miss will be able to make some of her own to play with. Keeping our eyes open for small pinecones...
Tuesday, May 11, 2010
Mother's Day Scarves
After visiting a couple kindergarten classrooms and watching them dye scarves for their mothers, I thought my fifth graders probably could use some help with Mother's Day gifts, too. So, I ordered scarves from Dharma Trading Co. (love them!), raided our classroom supply cabinets for bleeding tissue paper, and helped my kids out a bit.
Sure, it took me an entire day to iron 31 scarves. But, it was totally worth it. The kids loved to see each others' creative color combinations as I unrolled each scarf for ironing, and I think their moms loved receiving such unique gifts that they were likely not expecting!
I do not have a thorough tutorial for this craft, as it requires the use of bleeding tissue paper..... which, bleeds.... all over your counter and hands, and you need both hands to quickly fold/roll and clean up! Not much extra time for picture taking, so I hope my words will suffice for the first part of the tutorial and I will finish with photos.
For this project, you will need: a silk scarf, bleeding tissue paper (cut or torn to a size smaller than the width of your scarf), lemon juice and water (50/50) in a spray bottle, a safe place for the full of dye scarf to rest for a day (like an old plastic container or packaging of some sort), and an iron.
Lay your scarf out on a counter or other surface that you won't freak out if it gets a bit of color on it that won't clean off. I suppose waxed paper on your counter would work just fine.
Set your tissue paper pieces on your scarf, with the first piece/color being very close to the edge that you will start folding/rolling from. I used four rectangular pieces of tissue, two pieces each of two colors.
I then folded my scarf from my starting edge, spraying with the lemon juice mixture as I continued to fold. My students rolled their scarves, rather than folding them, and I really like the way they turned out. The color is more fluid and spots have a tie dyed effect that I enjoy. But, both methods are cool. You want the scarf to be wet, as this is how the tissue will transfer its color to the scarf. The lemon juice's acidity helps to set the color as well. Continue folding and spraying until you've reached the end of your scarf. Fold it some more if you need, and set it in your "safe place".
Leave it alone for a full day. Try to keep it out of the sun, as you don't want it to dry out. Spray with more lemon juice mixture if you need to.
After a full day, unfold your scarf and remove the tissue.
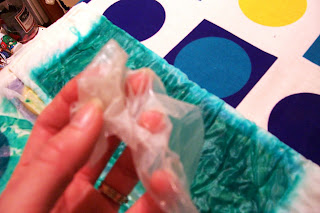
Set your iron to the silk setting and get to ironing! This will set the color and dry out your scarf. If it is still too wet, I would recommend using a pressing cloth for a while first, then iron over the whole scarf without it.

Voila!
 (folded method)
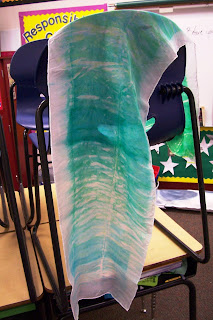 (rolled method)
A simple piece of yarn is all you need to wrap your gift.
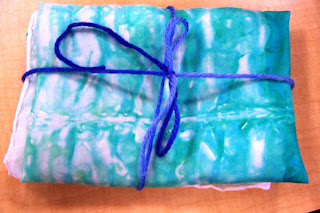 (rolled method)

Also, this post is linked up @


Sure, it took me an entire day to iron 31 scarves. But, it was totally worth it. The kids loved to see each others' creative color combinations as I unrolled each scarf for ironing, and I think their moms loved receiving such unique gifts that they were likely not expecting!
I do not have a thorough tutorial for this craft, as it requires the use of bleeding tissue paper..... which, bleeds.... all over your counter and hands, and you need both hands to quickly fold/roll and clean up! Not much extra time for picture taking, so I hope my words will suffice for the first part of the tutorial and I will finish with photos.
For this project, you will need: a silk scarf, bleeding tissue paper (cut or torn to a size smaller than the width of your scarf), lemon juice and water (50/50) in a spray bottle, a safe place for the full of dye scarf to rest for a day (like an old plastic container or packaging of some sort), and an iron.
Lay your scarf out on a counter or other surface that you won't freak out if it gets a bit of color on it that won't clean off. I suppose waxed paper on your counter would work just fine.
Set your tissue paper pieces on your scarf, with the first piece/color being very close to the edge that you will start folding/rolling from. I used four rectangular pieces of tissue, two pieces each of two colors.
I then folded my scarf from my starting edge, spraying with the lemon juice mixture as I continued to fold. My students rolled their scarves, rather than folding them, and I really like the way they turned out. The color is more fluid and spots have a tie dyed effect that I enjoy. But, both methods are cool. You want the scarf to be wet, as this is how the tissue will transfer its color to the scarf. The lemon juice's acidity helps to set the color as well. Continue folding and spraying until you've reached the end of your scarf. Fold it some more if you need, and set it in your "safe place".
Leave it alone for a full day. Try to keep it out of the sun, as you don't want it to dry out. Spray with more lemon juice mixture if you need to.
After a full day, unfold your scarf and remove the tissue.

Set your iron to the silk setting and get to ironing! This will set the color and dry out your scarf. If it is still too wet, I would recommend using a pressing cloth for a while first, then iron over the whole scarf without it.

Voila!
 (folded method)
 (rolled method)
A simple piece of yarn is all you need to wrap your gift.
 (rolled method)
Please come on back to visit on Monday,
as I will be participating in
Also, this post is linked up @
Thursday, April 29, 2010
May Day Baskets--All Finished and Filled!
Last week, I started my students on a May Day basket project. Today we finished our baskets and filled them with paper flowers.

Cute, huh?!
To make the flowers is simple. If you ever helped make a float for high school homecoming, 4th of July parade, or something like that, do what you did then. If you never did any of those things, do this:
Take 4 squares of tissue paper.
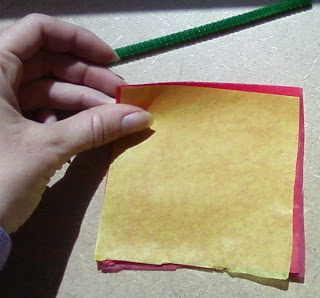 The squares can be any size, really, but ours were about 4" square. Stack them neatly and fold them accordian-style.

Tie a pipe cleaner in the middle of the paper accordian.
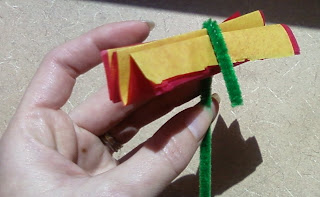
Gently pull each piece of tissue to the center and then fluff to your liking.

See? Easy!
Linked up at:


Cute, huh?!
To make the flowers is simple. If you ever helped make a float for high school homecoming, 4th of July parade, or something like that, do what you did then. If you never did any of those things, do this:
Take 4 squares of tissue paper.
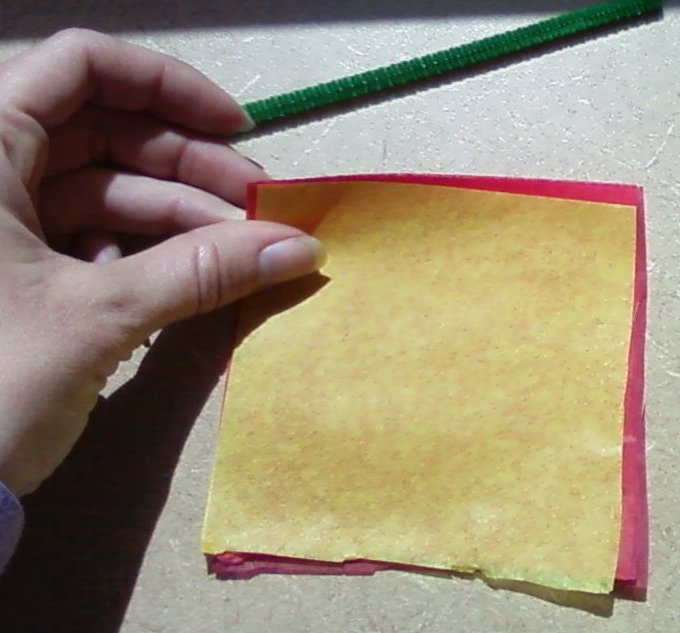

Tie a pipe cleaner in the middle of the paper accordian.
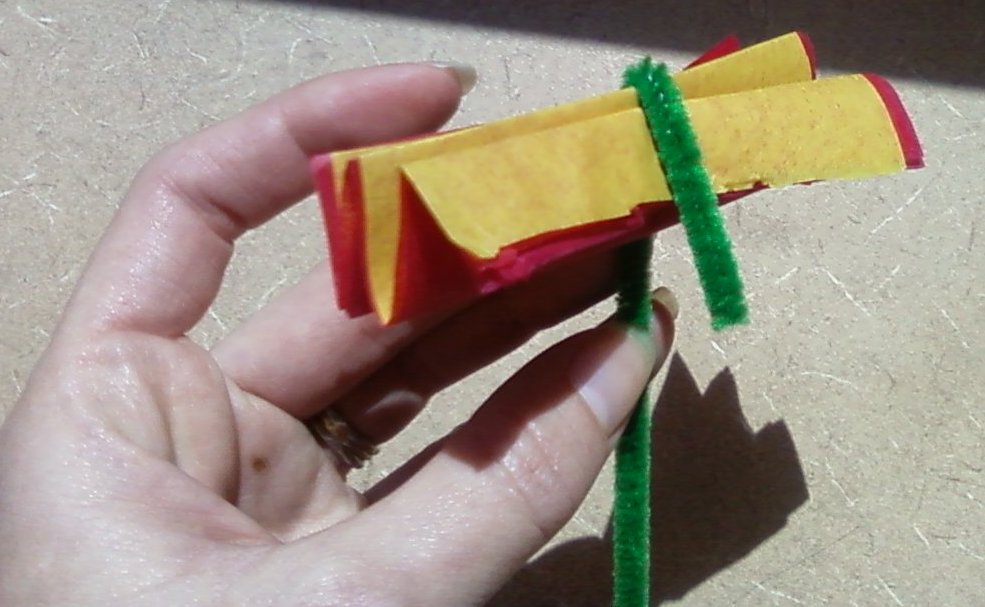
Gently pull each piece of tissue to the center and then fluff to your liking.

See? Easy!
Linked up at:
Thursday, April 22, 2010
Earth Day May Day Baskets
Being the me that I am, I had to figure out something to do with my students to celebrate Earth Day today. My lesson plans for the day quickly evaporated, as one thing led to another (as is often the case). But, I still managed to pull this one off. The project is not finished, as we did not have a long enough chunk of time, but we got to talk about the good Earthy stuff on Earth Day, so I consider it a success in progress.
We started making baskets for May Day.
I've been collecting used strawberry baskets as I use/find them. And, we have a nice cubby filled with scratch paper. So, we reused those two items to begin our May Day basket-making, and had a brief lesson in reuse, as well as doorbell ditching etiquitte. It took me back to 20ish years ago when my sister and I would make May Day baskets, fill them with Spring flowery goodness, ring the bell of an unsuspecting well-loved neighbor, set the basket on the porch, and run... Good stuff.
And, you can do it with your kiddos, too. You just need colored paper that has already lived a good, used life (remember, we're talking reuse here), scissors, and a strawberry basket.
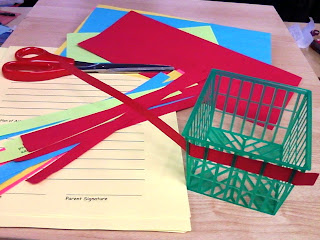
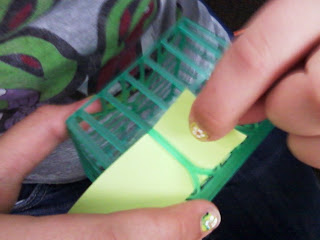
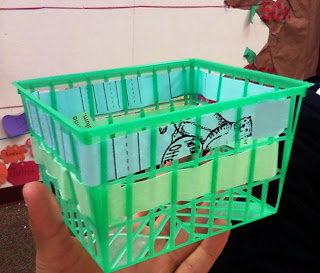
Cut strips of paper that will fit through the spaces on the sides of the basket, and weave them in and out.


We started making baskets for May Day.
I've been collecting used strawberry baskets as I use/find them. And, we have a nice cubby filled with scratch paper. So, we reused those two items to begin our May Day basket-making, and had a brief lesson in reuse, as well as doorbell ditching etiquitte. It took me back to 20ish years ago when my sister and I would make May Day baskets, fill them with Spring flowery goodness, ring the bell of an unsuspecting well-loved neighbor, set the basket on the porch, and run... Good stuff.
And, you can do it with your kiddos, too. You just need colored paper that has already lived a good, used life (remember, we're talking reuse here), scissors, and a strawberry basket.
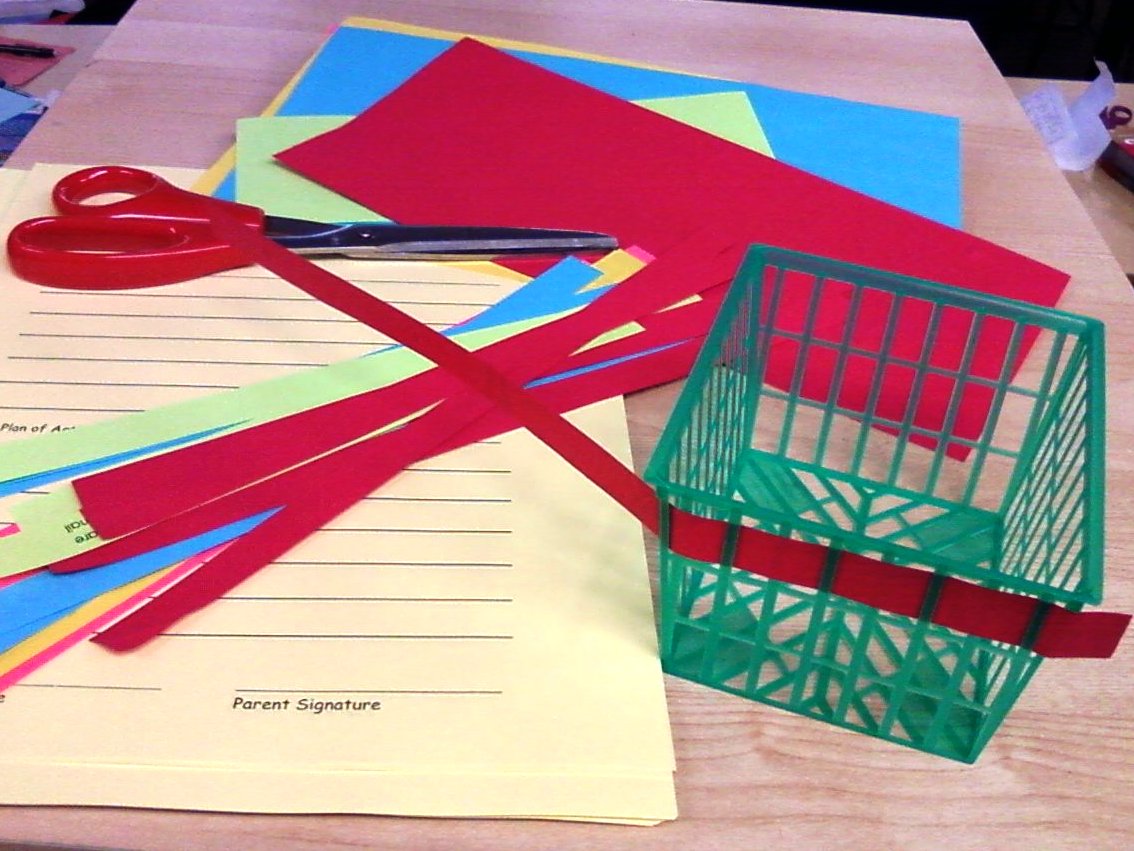
Cut strips of paper that will fit through the spaces on the sides of the basket, and weave them in and out.


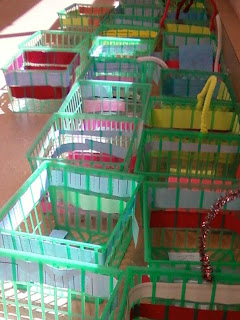
Keep doing this until your basket is completely decorated. I do not have any pictures to show you for this. Not sure if we'll have time to tackle finishing these tomorrow. We'll see. They will be finished by next Thursday, for sure, and I will post the finished product pictures. Here's what is sitting in my classroom right now; come back on Thursday for the finished basket pics!

Sunday, May 31, 2009
Make Shopping Bags and Give Them Away
I don't have time to add this to my plate right now, but I sure would like to someday. What a great way to practice a random act of kindness for a stranger and for the Earth! Here are the details:
Let’s do something positive to reduce the hideous number of plastic bags being used - 1 million are consumed per minute globally - of which hundreds of thousands end up in the oceans.
The idea is to get together with people in your local community, drink wine and make reusable cloth bags (from old duvet covers, curtains from charity shops etc) and hand them out to the unsuspecting public for free on specified dates outside different supermarkets.
Meet new people, do something marvellous for the planet and beat other pods (groups) of baggers with your morsbag tally.
Go to http://www.blogger.com/www.morsbags.com to be a part of a wonderful thing!
The idea is to get together with people in your local community, drink wine and make reusable cloth bags (from old duvet covers, curtains from charity shops etc) and hand them out to the unsuspecting public for free on specified dates outside different supermarkets.
Meet new people, do something marvellous for the planet and beat other pods (groups) of baggers with your morsbag tally.
Go to http://www.blogger.com/www.morsbags.com to be a part of a wonderful thing!
Let me know if you start a pod, and perhaps I can join you.
Ooh, this would be a fun thing to get my students involved in. I wonder how I could facilitate that in class without sewing machines.... Remember, I am working with 30 ten-year-olds. Any ideas?
Monday, February 23, 2009
She's crafty!
Long ago, my brother-in-law sent me a link to a crafty mother's blog. Why he came upon it, I do not know. But, I am glad that he did. I check out Zakka Life frequently. Not only is she a talented lady who also enjoys knitting for her kiddos, but she also lives in Hawaii and her blog reminds me of good times I've spent there. Ah.
More recently, my sister sent a link to amazing mae, another crafty mother. I immediately (I cannot stress how quickly this actually happened) tried her tutorial for making swirly heart crayons out of tiny crayon nubs and rubbery ice cube trays. I used trays I already had from Ikea. The result is beautiful color-swirled crayons that are now useful again, and loved by children. For me, it was easier to remove the crayons from the molds while they were still just a touch warm. I also made these as Valentine gifts for my students. After telling them not to eat them, it was exciting to see fifth graders enjoy the feel and smell of a "new" crayon and appreciate that it was a handmade gift. It was easy to find enough crayon nubs from my classroom crayon tub, as the kids always pass over the tiny bits in search of bigger, whole crayons. So, now I have a little box in the classroom dedicated to crayon nubs. The kids are now very aware of filling the box, rather than throwing crayon bits on the floor or in the garbage can. In the future, as I find new ice cube tray shapes, it will be a great way to create fun, "new" supplies for the classroom.
Most crayons are made from petroleum. Yuck. Petroleum is a non-renewable resource, takes many many years to biodegrade, and is not a happy thing to find lingering in your water supply. Crayon nubs may seem small, but if they stack up in our landfills, that is not a good thing. Why not turn them into a "new" product and keep them out of the landfill altogether? Recycling at it's best!
*Side note: My favorite brand of crayon, which I buy for my daughter to use, is Stockmar. It is a German brand, made of beeswax. Not only am I keeping petrochemicals away from her young skin, but she also colors among the joyous smell of beeswax.... Yum. Petrochemicals are known as possible carcinogens and endocrine disrupters. All the more reason to look for soy- or beeswax-based crayons for our children.
More recently, my sister sent a link to amazing mae, another crafty mother. I immediately (I cannot stress how quickly this actually happened) tried her tutorial for making swirly heart crayons out of tiny crayon nubs and rubbery ice cube trays. I used trays I already had from Ikea. The result is beautiful color-swirled crayons that are now useful again, and loved by children. For me, it was easier to remove the crayons from the molds while they were still just a touch warm.
 I also made these as Valentine gifts for my students. After telling them not to eat them, it was exciting to see fifth graders enjoy the feel and smell of a "new" crayon and appreciate that it was a handmade gift. It was easy to find enough crayon nubs from my classroom crayon tub, as the kids always pass over the tiny bits in search of bigger, whole crayons. So, now I have a little box in the classroom dedicated to crayon nubs. The kids are now very aware of filling the box, rather than throwing crayon bits on the floor or in the garbage can. In the future, as I find new ice cube tray shapes, it will be a great way to create fun, "new" supplies for the classroom.
Most crayons are made from petroleum. Yuck. Petroleum is a non-renewable resource, takes many many years to biodegrade, and is not a happy thing to find lingering in your water supply. Crayon nubs may seem small, but if they stack up in our landfills, that is not a good thing. Why not turn them into a "new" product and keep them out of the landfill altogether? Recycling at it's best!
*Side note: My favorite brand of crayon, which I buy for my daughter to use, is Stockmar. It is a German brand, made of beeswax. Not only am I keeping petrochemicals away from her young skin, but she also colors among the joyous smell of beeswax.... Yum. Petrochemicals are known as possible carcinogens and endocrine disrupters. All the more reason to look for soy- or beeswax-based crayons for our children.
Subscribe to:
Posts (Atom)